Showing posts with label finished. Show all posts

Tuesday, 23 July 2013

Beautiful satin wedding gown!

I've been quite shamefully lapse in blogging about my creations for a little while now but I have been rather busy of late! One of my main projects that was occupying a lot of my attention up until a month ago was a wedding gown commission that came with matching cravats, flower-girl's dress and tiara. It was lovely making something so special and it's been quite hard keeping it all under wraps but she got married yesterday so I can finally share some pics of my work with you! As it's likely to be quite picture heavy I'll put the gown itself in this post and then all the other bits in one to follow tomorrow.

The gown: an a-line dress with a structured, boned bodice and chapel train in a beautiful red duchess satin, covered in over 2000 beads and Swarovski crystals (all individually applied) with tiny covered buttons running down the back. While the front was beautiful it was the back where the real 'Wow' was, with over 1500 of the beads/crystals on the train itself and a diamond cut-out detail from the nape of her neck to the waist.

From the front:
Detail of the skirt beading:
More skirt beading:
The back cut-out and chiffon section (unfortunately the dress was slightly to small for my mannequin to I had to photograph this part on the hanger): 
The train:
The bride was absolutely thrilled with it, which is the most important thing, hopefully everyone else on the day loved it too!


Wednesday, 7 November 2012

I'm back!

Oops, bit of a longer break from blogging than I'd planned but things all ended up getting a bit hectic! On the plus side, this does mean I have loads of stuff to show you... I'll try not to send it all out at once though so you won't get overloaded!

A few weeks ago I had a rather efficient weekend and finished off lots of little bits of jewellery that's been loitering partly done in my workbox. Some of them really did only need the slightest bit of work to be finished, but it's amazing how easy it is not to get round to doing the tiny things!

First off, a pair of simple spiral earrings made from silver plated wire. I've got a bit of a thing for spirals at the moment, these came out of wanting to play around with making some double-spiral shapes. All I had left to do was to add the hooks, that's how lazy I was being not finishing them!
Secondly, another pair of earrings, this time solid sterling silver with silk tassles made from silk dyed with logwood:
I also finished off and added jump-rings to two little copper shapes that I made during an 'Introduction to Enamelling' course at York School of Jewellery during the summer. I really like how they've come out even though it was my first attempt at enamelling:
And finally, something that I've been working at on and off for years and had a big push recently to finish. This is a tear drop fossil (can't remember the proper name, sorry!) set in sterling silver which has been chemically treated to give it a grey sheen. I haven't entirely decided what it'll hang on permanently so I'm using a black rubber necklet for now:

Monday, 9 July 2012

The evolution of an existing pattern...

I have a regular customer who has had two dresses made from the same pattern previously (the last one featured in my blog a couple of weeks ago). For a wedding a week or so ago she asked if I could find a suitable fabric for a summer wedding and make her a dress using the same bodice but with a fuller skirt to give it a softer look.

Fortunately we managed to find the perfect fabric (so perfect in fact that I bought myself some to make a summer skirt) and after drafting a new skirt pattern the resulting dress was exactly what she had in mind:
I think she's had more traumas finding the matching accessories than she did the dress - she's got the bag and belt (white of course) but the right shoes weren't easy to find at all!

Monday, 2 July 2012

From sari to dress

Another prom dress to share with you this week, this time made from a length of Sari silk that had been brought back from a trip to India.

The dress itself is fairly simple, the hardest part was deciding how best to cut it to use the most dramatic parts of the sari. In the end we went for a 'princess line' bodice (with sweetheart neckline) cut so that what used to be the border of the sari now sits along the waistline of the dress. 
The skirt was then cut as two rectangles to allow us to use the border around the hemline, with pleats at the waist gave the skirt some shape. 
The lining in this dress is serving a joint purpose of reducing the sheerness of the dress and supporting the silk along the zip and waist seams (yes, the silk is that fine!)

This is definitely one of those dresses that doesn't show it's full glory on a dressmaker's dummy (not helped by the weird light most days at the moment, even the morning's aren't really good enough for photography!). The girl it's for looks absolutely stunning in it, filling it out in a way an inanimate dummy just can't imitate so you'll have to take my word for it. It's still a really cute dress even on a dummy though...

Friday, 15 June 2012

Repeating oneself...in a good way!

I suppose the best way to be sure that you're doing something right is to be asked to do exactly the same thing again. Back in January I made a smart red cotton dress for a customer who does quite a bit of public speaking. I knew she loved it and was getting quite a bit of wear out of it, but I was delighted when she came back to me earlier in the month and asked me to make her another one, this time in navy.

It's almost exactly the same as her previous one: a 'klona' cotton dress with a net underskirt to give the skirt structure...
The only difference is that this time the lining is navy with white spots (the previous was white with red spots that matched the outer layer)
And another delight - when she came for her final fitting and tried it on she ordered another dress. I'm clearly doing something right, must make sure I keep it up!!

Monday, 4 June 2012

A bit more de-stashing (finally!)

Something I've made for me this time, as part of my ongoing sewing-from-stash - a project which I started with enthusiasm at the start of the year but got a little bit side-tracked from in March and April!

Even though it's quite a simple pattern and was reasonably quick to make up (cut & sewn in a day) this dress is quite a big step as it's:
a) a pattern I made about 3 years ago,
b) fabric I've had in my stash for about the same length of time, bought for this pattern, complete with zip and thread which had been kept together.
c) a summer dress, that I've managed to make in time for our (theoretical) summer.


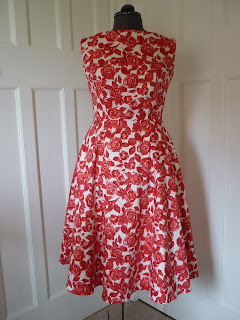
And, voila! One sleeveless summer dress...
It's made from cotton shirting and lined with polycotton poplin. There's a hip-length back zip (invisible of course) so it can just be stepped in to & done up (none of this 'over your head' malarkey) and the bottom of the lining is trimmed with cream lace edging that just peeks out to give it the look of a petticoat underneath.
Now I just have to hope for enough sunshine this year to get some wear out of it!!

Monday, 28 May 2012

Bridesmaid dress with a difference

Today I've got a bridesmaid's dress with a difference to show you. This is one of two dresses that I'm making for a wedding in June which are completely different styles from each other, chosen to suit the girls who are wearing them. Both dresses use the same soft Italian lace fabric as the top layer of the dress, which ties them together beautifully.

This dress is in a 50s style, with a fitted waist and flared skirt. The neckline is high at the front but a very deep 'v' on the back which will look stunning as she walks up the aisle after her sister (in fact, her sister has threatened to send her up first so she can see it too, although I'm not sure if she'll go through with that one the day...)
The top fabric is beautiful soft Italian lace in a colour best described as mushroom with gold threads running through it, which has been set over an iridescent chiffon underlay and lining, and the whole combination is beautifully floaty when it's being worn!
 

Monday, 21 May 2012

Second prom dress of the year

My second prom dress of the year is also in cotton jersey fabric but that's where the comparison with the red dress in previous posts stops. It's just as gorgeous but completely different.

This dress is floor length, with a deep 'v' neckline front and back, individually applied Swarovski crystal stars on the under-bust band both front and back and a leg-split topped with a crystal star.

Full-length shot:
Showing the front and back together (you can just see the star at the top of the leg split):
The star at the top of the split:
The girl this is made for is really thrilled with it, which is always gratifying, and it does look absolutely stunning on her (I know, I'm slightly biased, but it really does!)   
 

Wednesday, 28 March 2012

Making triangle from straight pieces...

Ok, a change from the dressmaking now to show you progress and final pics from a pendant commission I've been working on.

The brief? A 'simple' inverted triangle with a hanging loop at the top. Sounds easy, and in a way it is, but there are a lot of stages involved nonetheless.

I started with a flat strip of silver and filed a v-shape in the centre (unfortunately I forgot to take a picture of this so you'll have to use your imagination) then folded the resulting piece up to create the bottom half of the triangle:
Once this was soldered to secure it, I then filed the tops of the two prongs so that they lay flush with the piece going across the top and soldered the top bar in place:
The protuding ends were filed back flush to form a perfect triangle before all the faces were emeried smooth:
I then attached a small ring to the top of the triangle for the jump ring to go through, and polished the whole pendant up. The result is indeed a simple but beautiful pendant:
(although try as I might I couldn't get it to lie flat and not look wonky while photographing it in the box!)

Tuesday, 4 October 2011

Pretty lacy dress (lots of pics!)

This won't be so much a wordy blog as a phew of photos of my most recently finished commission: a lace bodiced dress with a full tulle and net skirt. 
The top part of the bodice was lined with satin dupion (for modesty's sake!) and the same satin dupion featured under the top layer of tulle in the skirt:
The lace motif was transferred on to ribbon (to stabilise it) and ran over the shoulders to form elegant straps:
Swarovski pearls dotted the tulle, which was finished off with a ruffled hem:
All in all, quite a fancy dress but fun to make and it did look good on the girl who's going to be wearing it!

Monday, 18 April 2011

Nice to be finished...

Last week I finished a commission that I'd been working on for a little while. Why didn't I blog about it then? Because it was quite a special item and I wanted the person who'd commissioned it to see it before the world did.

So what was it? A ring. Not just any old ring though, it was a ring to hold a pink sapphire which had been in the family for years, having been brought back from India after the war. A very special stone then, which did make it quite a nerve-wracking commission to work on (especially when it came to setting the stone at the end).

It had been set in a claw setting previously but it didn't seem too happy to stay put in place, and she was beginning to be afraid to wear it for fear of it dropping out. So the ring I designed for it combined being a more secure setting with a very sleek modern design which although it had less of the stone on display highlighted the stone better.

And what did it look like? This...
 
pretty stunning, no? 


And yes, she was pleased with it. Which is a relief really!