Tuesday 28 February 2012

Handmade Mother's Day gifts that really won't break the bank!

Given the speed the year so far seems to have gone, Mother's Day will be here before we've had time to catch our breath. While it's nice to give your mum a treat, I know most people don't have much spare cash at the moment so I've put together a little guide to some of the beautiful handmade items that I've got for sale on my website that shouldn't break the bank.

I've broken them down in to two groups - under £10 and under £20 (of course, if you want to spend more you're most welcome to, but that's not the point of this little guide!) and I've taken my postage charges in to account when selecting them so you really can get them ordered & sent to you for less than the headline amount!


Gifts for under £10

If you've got a mum who enjoys a night out and would like something a little quirky to put in her handbag, how about one of these cute coin purses? They're guaranteed to make her smile when she pulls it out to find her change!


Whether you think she'd prefer fabric or crochet, these unusual corsages make a great addition to any coat or cardigan:
      

Or, if you've got a creative soul for a mother, why not consider one of these corsage kits? (currently only for sale through my Folksy shop) Each kit contains enough materials to make 2 corsages, and once she's made those she'll still have the instructions so can carry on making more...who knows you might end up getting one back as a gift at some point?

Gifts for under £20 

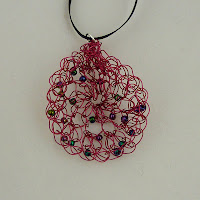
Pretty much all of my coloured wirework jewellery comes in to the £10-£20 bracket, which gives you a great range of earrings, bracelets and pendants to choose from...and some lovely colours too including purple, turquoise, lilac, blue, red, hot pink and dark green.
      

Alternatively, if silver's more her thing, both of sizes of my silver wirework earrings slip under the £20 mark, as do the pendants (I'm afraid the bracelets just tip over at £21 plus postage).
       

Or, if you think she'd prefer something a bit more practical for everyday use, I have just one sturdy shopper left in stock!

So whatever you think she'd like, go on...treat your mother!

Wednesday 8 February 2012

Sewing with tissue lame

After finishing a recent project which reminded me how daunting tissue lame can be if you haven't used it in a while I thought I would share some tips to take some of the mystery out of it. Please don't launch straight in to a precious piece of fabric with these though, test them on a scrap and play around with the settings on your machine as they all behave slightly differently!
Cutting the fabric
Don't use your best dressmaking shears to cut the lame. The metallic threads will blunt your shears in no time. If you can, buy a cheap pair especially, or clean-up and use a different pair of household scissors.

Needle  
If you don't use the right type of needle it will catch as it sews, resulting in 'ravels' and pulls all up your seam. Although it's not a jersey fabric at all, you will probably find that a jersey (aka ball-point) needle works best. Make sure your needle is new and change it more regularly than you usually would - as with scissors, the metallic threads wreak havoc on the needle. You'll be able to tell if it's too blunt as you'll start to get pulls in the fabric again.

Tension
You should find that normal sewing tension works fine, however if you get a rippled effect on your seam the best way to remove this is to use the same trick as with chiffon and other fine fabrics - while feeding your material through to sew, pull gently on the seam coming out from behind the presser foot (not enough to drag the fabric through faster than it otherwise would but enough to increase the tension in the fabric)

Enclose all your edges
You need to finish all your edges on tissue lame otherwise it will fray within minutes. Don't try to overlock them, however, as it looks messy on this fabric. The best way to finish them is some sort of enclosed seam - I would suggest either a french seam, or even better a 'run and fell' seam (both sides shown below):
The same goes for your hem: chose a rolled hem if at all possible. If you've got a rolled hem foot for your machine the fabric should go through fine, if not, leave an extra hem allowance and do a thicker hand-rolled hem.
If you do particularly want to leave a raw edge, run a narrow zig-zag stitch about 1/2cm from the edge to reduce the likelihood of fraying reducing your fabric to bare threads.

Oh, and take your time! Tissue lame is not a fabric you want to have to unpick a long seam from!!

Once you've done it though, you'll be able to stand back and feel proud of your work. It is a fabric that can create amazing garments!